DIY书架:12个步骤学会制作木质书架

Albert Evans 02-08-2023
Albert Evans

说明

在床头安装一个精心设计的木质书架,您不必是一个书虫,也能享受到书架的功能。 毕竟,如果您不打算在床头书架上放满书,那么这个空间当然可以被其他元素占据,如灯罩、纸巾盒、玻璃杯、手机充电器等。

但如果你认为自己是一个爱书之人,而且你是那种总是喜欢在睡觉前看完一两章书的人,那么这个DIY书柜教程绝对是为你量身定做的。 只需几块木头,我们就能制作出一个可爱且非常容易制作的床头书柜,完成后可以安装在你的床边。(这意味着它不会占用太多空间)。

让我们开始吧

如何制作DIY书柜:我们的目标

那么,我们DIY的木制书架是什么样的呢? 正如您所看到的,我们的床头书架将安装在墙壁上,因此它不仅提供了一个底座,您可以在上面存放/展示一些您喜爱的书籍,而且它还有一个可爱的小 "屋顶",您可以在上面放置一些打开的书籍。

请看这张照片,我们将用三块主要木料来制作书柜:底座、侧面和屋顶。

第1步:开始测量和标记您的木料

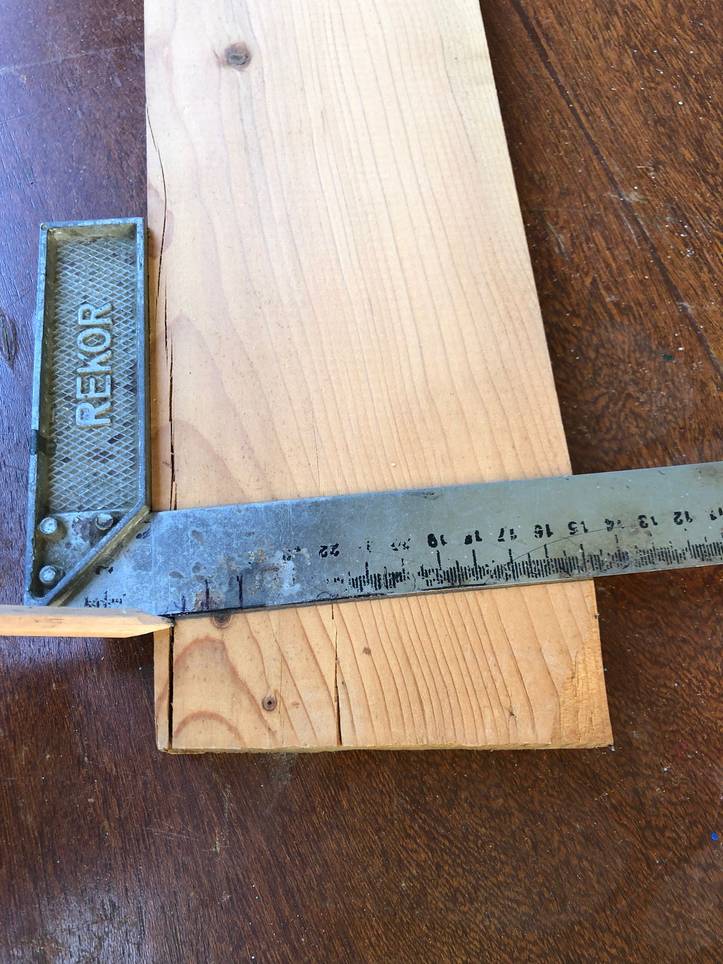
- 由于我们不会对木片的大小和尺寸进行详细说明,所以您完全可以自由选择DIY床头柜的尺寸。 不过,请确保您的床头柜尽可能与我们的一致,以保证您在学习教程时不会迷失方向。

如果您正在练习木工技能,您可以从这个眼镜架项目开始!

第二步:标记屋顶

- 取一块用作侧板的木板。

- 用尺子和铅笔在这块木板上仔细标出屋顶的形状,以便我们稍后在固定L形屋顶之前将其裁剪下来。

第三步:标记将如下所示

到目前为止您还能坚持吗?

小贴士:请确保您在这块木板的顶部中心钻了一个孔(如下图所示)。 这样您就可以在教程的最后将架子固定在墙上。

第4步:屋顶的L型部件

我们将用这个L型部件来做屋顶。

如果您的细木工技能很好,您应该可以很容易地测量、锯开并用胶水/螺丝钉将两块相等的木头粘在一起来制作您的屋顶(它可以完美地安装在您在上一步中刚刚切割出来的底座上)。 但是,如果您使用锯子和木头会对您自己和他人造成危险,请找一个更有经验的人来帮您制作。L型屋顶。

第五步:必要时再切割

- 仔细测量,不仅要确保L型屋顶的两块木板在尺寸、长度和形状上完全相同,而且要确保组成DIY架子的所有木板的尺寸和厚度都是正确的(我们很快就会把它们连接在一起)。

第六步:检查木质部件

此时,您应该准备好三块木板来组装您的书架:用作底座的木板,带有尖角(用于安装屋顶),L形屋顶,以及底部底座(如果您需要,可以加厚/加长),完成后您将在这里堆放书籍。

See_also: 如何用衣夹制作花瓶,9个简单又有创意的步骤

学习如何制作漂亮的飞机形状的架子!

第7步:拼接和标记

- 在开始锯木头和拧螺丝之前,首先将木片按照固定的方式拼接成架子。

- 当您对架子满意时,用铅笔标出不同部件的位置。

第八步:开始钻孔

- 用电钻在木头的适当位置钻孔。

第九步:使用锤子和钉子

- 在正确的位置钻好孔后,将木片堆叠成正确的形状。

- 用锤子和钉子轻轻地将不同的部件连接起来,让您的床头小书架栩栩如生。

- 一旦您将所有的木料钉在一起,我们建议您用鸡毛掸子或干布将书柜擦拭一遍,以除去灰尘。

第10步:欣赏您的进步

- 您的DIY床头书柜现在看起来如何?

- 事实上,您选择用多少个钉子来固定不同的部件并不重要,只要最终的结果足够牢固,在您组装并开始堆放书籍时不会散架即可!

制作浮动床头柜的额外提示:

如果您想为您的书柜增添一些色彩(也许您是在为您孩子的房间制作书柜?

See_also: 贝壳装饰的海滩别墅

第11步:安装到墙上

- 还记得我们在第三步告诉您要打的那个洞吗? 现在,用钉子将床头柜固定在墙上。

第12步:您的DIY床头架完成了

为完成您的床头书架欢呼三声!

现在,您可以开始为书架增添个性和细节,摆放一些您最喜爱的书籍。

您觉得这个书架怎么样? 它和您的卧室装饰搭配吗?

Albert Evans

Jeremy Cruz is a renowned interior designer and passionate blogger. With a creative flair and an eye for detail, Jeremy has transformed numerous spaces into stunning living environments. Born and raised in a family of architects, design runs in his blood. From a young age, he was immersed in the world of aesthetics, constantly surrounded by blueprints and sketches.After obtaining a bachelor's degree in Interior Design from a prestigious university, Jeremy embarked on a journey to bring his vision to life. With years of experience in the industry, he has worked with high-profile clients, designing exquisite living spaces that embody both functionality and elegance. His ability to understand clients' preferences and transform their dreams into reality sets him apart in the interior design world.Jeremy's passion for interior design extends beyond creating beautiful spaces. As an avid writer, he shares his expertise and knowledge through his blog, Decoration, Interior Design, Ideas for Kitchens and Bathrooms. Through this platform, he aims to inspire and guide readers in their own design endeavors. From tips and tricks to the latest trends, Jeremy provides valuable insights that help readers make informed decisions about their living spaces.With a focus on kitchens and bathrooms, Jeremy believes that these areas hold tremendous potential for both functionality and aestheticappeal. He firmly believes that a well-designed kitchen can be the heart of a home, fostering family connections and culinary creativity. Similarly, a beautifully designed bathroom can create a soothing oasis, allowing individuals to relax and rejuvenate.Jeremy's blog is a go-to resource for design enthusiasts, homeowners, and anyone looking to revamp their living spaces. His articles engage readers with captivating visuals, expert advice, and detailed guides. Through his blog, Jeremy strives to empower individuals to create personalized spaces that reflect their unique personalities, lifestyles, and tastes.When Jeremy is not designing or writing, he can be found exploring new design trends, visiting art galleries, or sipping coffee in cozy cafes. His thirst for inspiration and continuous learning is evident in the well-crafted spaces he creates and the insightful content he shares. Jeremy Cruz is a name synonymous with creativity, expertise, and innovation in the field of interior design.